Submitted by florin on
Building a distributed VPN mesh (multiple VPN servers, authenticating same accounts, having same routing)? Want to give a security boost to authentication? Thinking about multifactor? Here's one of the many architectures that work.
This is part 1 of a series of articles:
- multifactor authentication for distributed VPN mesh - part 1, server and client configuration, cloud OTP
- multifactor authentication for distributed VPN mesh - part 2, token configuration, local OTP
- multifactor authentication for distributed VPN mesh - part 3, VPN mesh
OpenVPN is an open source VPN server/client. It runs on all important operating systems, and some smartphones. It is not an IPSec VPN app, but rather uses OpenSSL for encryption; that doesn't mean it's a "browser-based VPN" - it's a separate client process, it can tunnel arbitrary routes, even tunnel all traffic. It can do compression. In my experience, it is easier to configure than most IPSec servers, and it's very reliable. It could make a good foundation for a VPN infrastructure.
Certificate-based authentication comes default with the app; every client needs a certificate generated on your CA (certificate authority). Without it, it can't connect. This, alone, is rarely useful, especially if the certificate is not password-protected. A stolen laptop gives the attacker the means to connect to your VPN mesh - at least until the certificate is revoked by the admins.
OpenVPN also allows user / password authentication. This is already a step up, since an attacker would also need to know the password to connect. But in some cases, fixed passwords are deemed insufficient, since they can be captured in various ways and reused.
OTPs (one-time passwords) close that attack vector. In this case, each user carries an OTP generator, and the authentication backend must be able to recognize and accept/reject such passwords.
Multifactor authentication for OpenVPN
I will show how to configure OpenVPN to use 3 authentication factors:
- SSL certificates on the laptop
- OTP generated by a token
- a PIN that the user must remember and enter as a prefix for the OTP
The first factor is mandatory, since it also provides encryption. Each client will have its own SSL client certificate, which needs to match the SSL server certificate on the VPN server(s).
The other factors are optional. You can include both, use only one, or don't use them at all. Including / excluding factors is as easy as commenting out / in a line of configuration on the OpenVPN server(s). Broadly speaking, 2 factors are a minimum for good security in most cases.
Having 3 factors covers many different attack scenarios. Losing a laptop means only one factor is lost (SSL certificates); the other 2 (OTP token, and PIN) are not compromised. Even if a thief manages to steal a laptop with the OTP token plugged in, the PIN is still required. The failure modes of such a combination are quite improbable, so it should pass some of the most severe requirements.
Configuring OpenVPN in general is beyond the scope of this post. The software is almost self-explanatory, and comes with example config files for servers and clients that are good starting points. The OpenVPN HOWTO is an excellent resource, and the relevant parts are required reading for this project.
https://openvpn.net/index.php/open-source/documentation/howto.html
SSL authentication
This is part of the normal OpenVPN configuration, so I will only offer a few hints. The PKI chapter in the OpenVPN HOWTO is quite thorough.
Essentially, you'll have to create a CA in a secure location. You'll need to generate the master CA certificate and key, along with one or two other files. Then you'll need to generate your server certificates, which will be installed on the VPN servers.
After that, for each client you'll need to generate a client certificate. You could reuse the same client cert for many clients, but this is not recommended in most cases. Also generate the certificate revocation list for clients, and push it to the VPN servers, even if the list is currently empty - when the time comes to revoke a client (person leaving the company, or laptop was stolen), just regenerate the list and push it again. It's all in the HOWTO.
Be very careful with the security of your CA. Store it in an offline location, in a place that is physically secure. If the CA is compromised, you'll have to rebuild all certificates from scratch. This is true no matter what VPN solution you use.
Username / PIN authentication
SSL certificates alone are not enough in most scenarios. Adding username / PIN (or username / password) authentication gives your VPN infra a serious security boost, making it adequate in a majority of cases.
OpenVPN can do user/pass authentication via PAM. This is the authentication broker of choice on basically all modern Linux distributions. If you authenticate with user/pass against almost any backend on Linux, you're probably using PAM. To tell the OpenVPN server to use PAM, edit the main OpenVPN config file on the server (/etc/openvpn/[filename].conf) and add this line:
plugin /usr/lib/openvpn/openvpn-plugin-auth-pam.so openvpn
The path to the plugin may differ slightly for various OpenVPN packages out there. The above works on most Ubuntu versions, including 14.04. The "openvpn" parameter at the end tells PAM that it needs to route these authentication requests according to the configuration in a file called /etc/pam.d/openvpn. Create that file, and enter this content:
auth	required	pam_radius_auth.so debug
account	required	pam_permit.so debug
Now OpenVPN will forward user/PIN requests to a Radius server. Install FreeRadius from the package manager, and configure it to work with a MySQL backend. You may also have to install the Radius PAM plugin. On Ubuntu, a typical install command might be:
apt-get install freeradius freeradius-mysql apg libpam-radius-auth
Configure FreeRadius to use MySQL as a data store for user/PIN info. This is covered in the FreeRadius HOWTO and other documents like this.
The Radius PAM plugin needs to know to what Radius server to connect. This is done via /etc/pam_radius_auth.conf. Here's an example with localhost as the Radius server:
localhost your-radius-secret 3
The Radius secret string must match the string entered in the FreeRadius configuration in /etc/freeradius/clients.cfg.
Create a username and PIN in the radcheck DB in MySQL. On the OpenVPN client, edit the main client config file and add these lines:
auth-user-pass
auth-retry interact
Now you're ready to test. Fire up the client. It should prompt for a username and password.
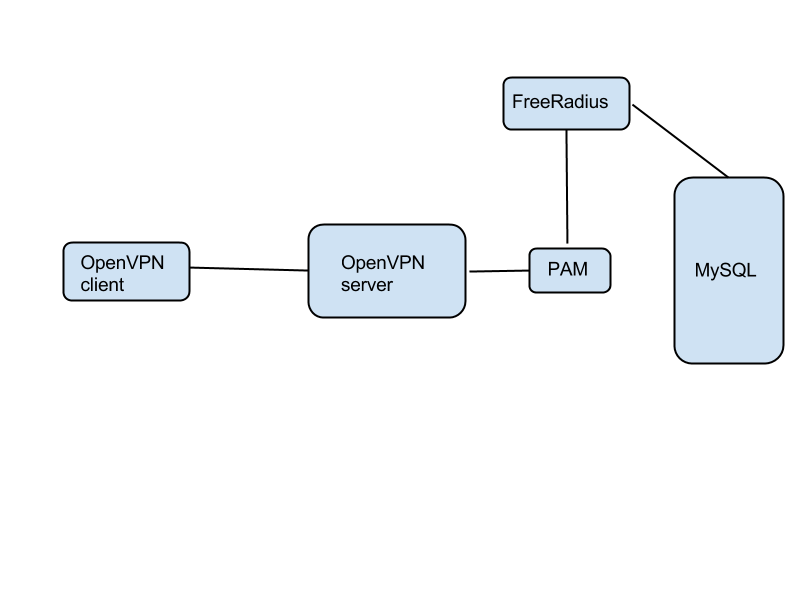
The user/PIN info is stored in MySQL. PAM and FreeRadius are only a proxy between it and OpenVPN.
OTP authentication, public backend
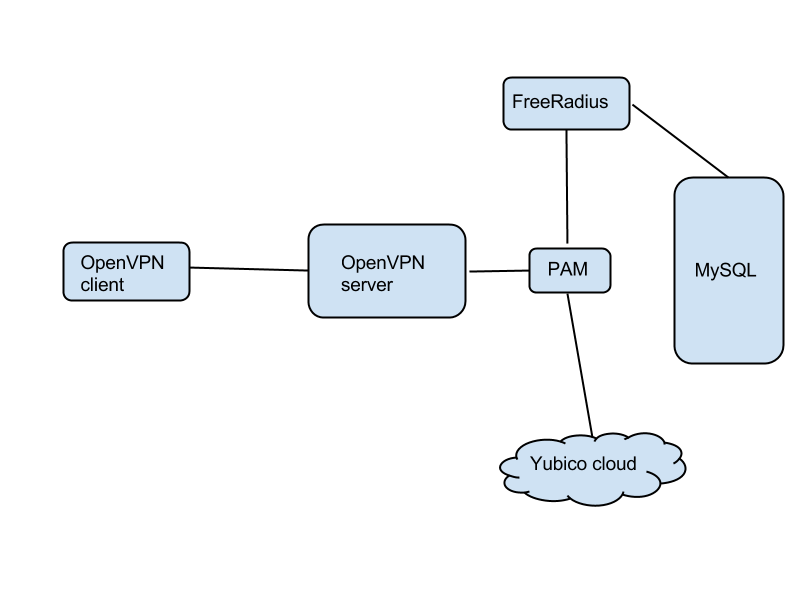
If you use an OTP token such as the YubiKey NEO, you have a choice: you could either pass the OTP authentication part to the Yubico public authentication cloud, or you could build your own OTP authenticator backend. This is the first option, using the free public authentication service.
The Yubico authentication software is available for free, with the projects stored on GitHub. What you need now is the Yubico PAM library. On Ubuntu do this:
add-apt-repository ppa:yubico/stable
apt-get update
apt-get install libpam-yubico
Now edit /etc/pam.d/openvpn with this content:
auth	required	pam_yubico.so authfile=/etc/yubico/yubikeyid id=16 debug
auth	required	pam_radius_auth.so debug
account	required	pam_permit.so debug
Create /etc/yubico/yubikeyid with the following format:
username:key-id
The key-id is the fixed sequence of 12 characters that prefixes every OTP generated by your token - just plug the NEO token into USB, fire up a text editor, and touch the gold sensor on the NEO. The OTP will be generated, and the first 12 characters are the key-id. Touch it again, a new OTP will come out, but the first 12 chars are the same.
Fire up the OpenVPN client, and when prompted, enter the username in the username field. In the password field, enter first the PIN that you've stored in Radius / MySQL. Then, with the cursor still in the same field, touch the gold sensor on the NEO token. It will generate an OTP and hit the Enter for you.
So, the credentials you enter are:
in the username field: ${user}
in the password field: ${PIN}${OTP}
This is the logic: When the authentication request from the client comes it, it is sent to pam_yubico.so, which knows how to extract the OTP from the password field. The library will query the Yubico cloud. If all is well, the request is handed down to pam_radius_auth.so, but with the OTP removed - the Radius module will do authentication against FreeRadius. The third line in /etc/pam.d/openvpn means you don't have to create Linux accounts for your users - the only accounts are stored in MySQL.
User-friendly OpenVPN clients
The same software, the openvpn daemon, runs as either server or client, on Windows, Linux and OS X. What you need on the client is a friendly GUI.
For OS X, look into Tunnelblick:
https://code.google.com/p/tunnelblick/
For Windows, see OpenVPN GUI: