Submitted by florin on
Here's a way to improve the security of your private SSH keys using a cheap smartcard.
Public / private key authentication for SSH works well, and is usually an improvement over the usual password authentication, both in terms of security and convenience. But the security of your private key becomes a crucial factor. There are several ways that the private key can be protected. One of these is the use of a smartcard to generate and store the key.
A smartcard is a device that can generate a pair of public and private keys, allows you to extract the public key, but keeps the private key stored on the card. The private key never leaves the card. Even during authentication, the private key remains on the card - and authentication itself is offloaded to the card. A PIN is required for the card to work, and the card will lock-up after 3 attempts at guessing the PIN, therefore rendering brute-force or dictionary attacks impossible.
When you're done, simply remove the token that carries the smartcard from USB. Easy, and probably more secure than the usual methods for storing private keys, in most scenarios.
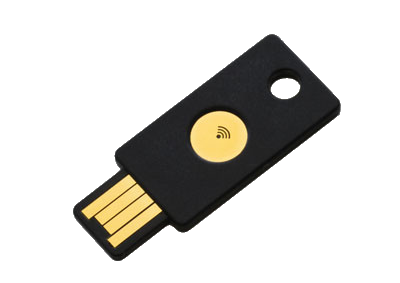
The YubiKey NEO, made by Yubico, is one such device. It's a mini-format USB token, flat as cardboard, small enough you could carry it on a keychain. It can perform 3 functions:
- OTP generator. The token is equivalent to a USB keyboard. When you touch the gold sensor, it "prints out" a string of characters that represents the OTP. This could be used with the appropriate backend to authenticate users on web sites, VPN connections, etc.
- FIDO U2F (Universal 2nd factor) token. This is supported by Google in recent versions of Chrome, and can be used to authenticate users on various websites using a physical token.
- smartcard storing various encryption certificates or SSH keys. It requires gpg-agent (part of the gnupg package) to interface with other apps such as ssh clients, etc.
NEO as a smartcard
Install software, generate keys
I've tested this with Linux and Mac OS X clients. First off, you need to install gnupg. On Linux, use the various package managers that come with your distribution. On OS X, you have two choices: download and install GPGTools, or install gnupg from Homebrew. GPGTools is preferred, since it launches gpg-agent automatically for you, and comes with a nice GUI-based pinentry program, but the Homebrew package also works.
To manage the smartcard, change PINs, and generate the keys, you will use the main gpg (or gpg2) app from the package. Take a look at man gpg or man gpg2 for the options: --card-edit, --card-status, --change-pin.
The token comes with two PINs: the user PIN, default value "123456"; and the admin PIN, default value "12345678". It is recommended to change these PINs.
After 3 failed attempts to guess the user PIN, the card locks itself up and you need to unlock it (gpg --change-pin) using the admin PIN. After 3 failed attempts to guess the admin PIN, the card is dead forever. Be careful with the admin PIN.
To generate a new pair of public / private SSH keys:
- run gpg --card-edit
- enter 'admin' mode
- choose the 'generate' option, then quit.
The card now has your public and private SSH keys stored. The private key will remain on the card forever. To extract the public key, run:
ssh-add -L > my-public-key.pub
You may have to edit the 3rd field in the key file and replace it with your username or email address, but that's optional. Then upload the public key to the instances where you need to authenticate, and append it to ~/.ssh/authorized_keys.
Configure the client system to use the smartcard
You need to configure gpg-agent on your laptop or desktop to run in ssh-agent emulation mode. The config file is ~/.gnupg/gpg-agent.conf and a typical content is:
pinentry-program /usr/local/MacGPG2/libexec/pinentry-mac.app/Contents/MacOS/pinentry-mac
enable-ssh-support
write-env-file
use-standard-socket
default-cache-ttl 600
max-cache-ttl 7200
The pinentry line is for OS X with GPGTools. If you're on Linux, or on OS X with gnupg from Homebrew, remove it. There are various pinentry apps out there, some text mode, some GUI, you can mix and match, and just use the right path in the pinentry line. Most if not all gnupg packages (Linux and OS X) come with at least one pinentry app.
Now you need to make sure gpg-agent is running. You could simply execute gpg-agent --daemon, but it will quit when you log out. One way to launch gpg-agent every time you log in, is to add this to one of the profile files, such as ~/.bash_profile:
# on OS X with GPGTools, comment out the next line:
eval $(gpg-agent --daemon)
GPG_TTY=$(tty)
export GPG_TTY
if [ -f "${HOME}/.gpg-agent-info" ]; then
    . "${HOME}/.gpg-agent-info"
    export GPG_AGENT_INFO
    export SSH_AUTH_SOCK
fi
GPGTools will launch gpg-agent automatically, so you can remove the first line. If you're on Linux, or you're on OS X with Homebrew, keep the first line.
Usage
The private key is on the NEO token, the public key was uploaded to the remote instance, gpg-agent is configured and running, the NEO token is plugged in - let's test it.
Simply ssh user@hostname to the instance where you've uploaded the public key. The pinentry app will prompt you to enter the user PIN for the smartcard. Then the authentication will proceed. The LED in the middle of the gold sensor on the NEO will blink, signaling activity. Then the connection will be established.
The settings shown above allow the PIN to be cached for a while. This way you can SSH into many hosts without entering anything. This comes in handy when you use Ansible for configuration management and you need to connect to dozens or hundreds of instances in the cloud, in parallel.
Notes
Smartcards work just fine on Linux and OS X 10.9.
The PCSC library on Mac OS X 10.10 is currently (Jan 2015) broken, and the smartcard - any smartcard, not just the NEO - will stop working randomly. Keep an eye on this bug report:
The symptom is that, once in a while, authentication will fail, or will get stuck. The remedy is to kill / restart gpg-agent, then unplug / replug the token. Here's a handy script that does all the killing / restarting for you:
#!/bin/bash

echo "kill gpg-agent"
code=0
while [ 1 -ne $code ]; do
	killall gpg-agent
	code=$?
	sleep 1
done

echo "kill ssh"
killall ssh

echo "kill ssh muxers"
for pid in `ps -ef | grep ssh | grep -v grep | awk '{print $2}'`; do
	kill $pid
done

echo "restart gpg-agent"
eval $(gpg-agent --daemon)

echo
echo "All done. Now unplug / replug the NEO token."
echo
When authentication is having issues, run that script, unplug / replug the NEO, and everything will work again for a few hours.
It's best to stay on 10.9 for now, if you plan on using smartcards.
EDIT: Possible workaround for the OS X 10.10 bug:
http://support.gpgtools.org/discussions/problems/28634-gpg-agent-stops-w...
EDIT2: GPG Suite nightly builds might contain a workaround for the PCSC bug in OS X 10.10. Give it a try if you're on 10.10 and are experiencing the gpg-agent issues described above:
https://releases.gpgtools.org/nightlies/
EDIT3: Latest GPGTools build seems to work just fine. Looks like they've fixed it.
EDIT4 (2015/09/29): According to Bruno Sutic, if you use gnupg2/Homebrew you may need to apply this patch to fix some issues between the Yubico token (or any smartcard) and gnupg2:
https://github.com/Homebrew/homebrew/pull/39248
Bruno says: Run "brew edit gnupg2", copy/paste patch, then install.
EDIT5 (2018/12/30): Update from Jeff Grafton:
https://gist.github.com/ixdy/6fdd1ecea5d17479a6b4dab4fe1c17eb