Submitted by florin on
It used to be that lasers were big bulky expensive things that required a laboratory to run and an entire factory to build. I remember the first He-Ne laser I saw two decades ago, the size of a small telescope and probably not more powerful than the laser pointer I carry on the keychain nowadays. Well, not anymore. It's pretty easy to build a laser today, on the kitchen table or in the garage, for a surprisingly small investment. The goal is to make a laser capable of burning small objects, such as a piece of paper, a balloon, etc, while keeping the whole project cheap - even as cheap as $35 if you don't make any mistakes. Here's how.
What to expect
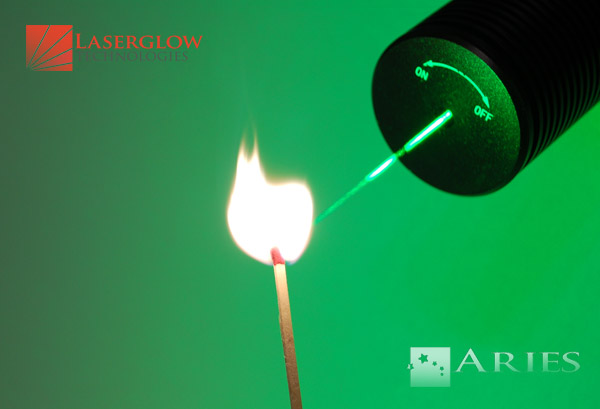
Here's a video I made of the two lasers I built recently. They can make holes in a piece of paper, can pop a balloon, ignite matchsticks, melt duct tape, etc.
That is what you should expect to be able to build after reading this guide. Looks fun? Okay, keep reading.
The extremely easy but pretty expensive way
This is cheating - you're not building a laser, you're just buying one made by someone else. It's also probably one of the most expensive ways, but the effort is minimal.
There are plenty of websites that will sell you a laser ready to use. Here's a short list:
A few details to keep in mind:
Things get really interesting if the laser power is 100 mW or more. Less than that, and it's pretty hard to burn or ignite objects.
At the same power, green lasers appear much brighter to the human eye than red or blue. So, if you want a laser that looks very powerful in addition to being very powerful, get a green one. But be prepared to pay a significantly higher price - green is expensive.
Prices will vary widely, but be ready to pay $200 for a red 100 mW laser, $300 for a blue one, probably more than that for a green laser. More powerful lasers cost more, less powerful cost less. A 500 mW green laser can be as expensive as $3000.
The easy and cheap way
Go on eBay and search for "laser module", "laser kit" or "laser diode". There are plenty of sellers who will provide you a full laser kit that you can assemble at home. This is the diagram of a basic diode-based laser:
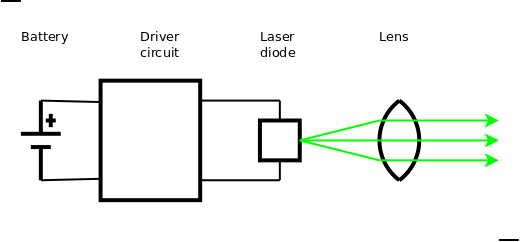
Typically, they will sell you the driver circuit, along with the diode encased in a small tube that contains the lens. Sometimes you can buy just the tube with the diode and the lens, and the driver circuit can be purchased separately.
In any case, make sure the lens can be adjusted. You may want to tweak the beam, focus it at different lengths, or make it parallel, which is not doable if the lens is fixed. Also, glass lenses are better, but more expensive than plastic; either one should work just fine for a small home-built laser like this.
The driver circuit needs to provide a fixed current (not fixed voltage, but fixed current) to the diode. The range for most diodes is between 30 mA and 250 mA. The bigger the current, the more powerful the beam, but the diode's life will be shorter. Most diodes, when fed 100 ... 150 mA, will produce a 100 ... 150 mW beam, which is plenty fun - also, that current level is acceptable for most diodes and won't make them die prematurely.
Most drivers are adjustable, and that's the kind you want, in order to tweak the current that goes to the diode. A digital multimeter, if you have one, would be very helpful here, as it will tell you exactly what's the current through the diode.
Of course, you can design and build the driver circuit yourself from scratch, if you have the knowledge. Something based on the LM317 circuit should be okay. Make it adjustable, and be sure to measure the current you're sending to the diode. Protect the output against spikes with an R-C circuit (10 microF and 1 k-ohm, or something like that) in parallel with the laser diode.
Currently (May 2010) you can buy a 80 ... 150 mW blue laser (405 nm) kit, including the diode+lens assembly tube and the driver circuit kit (parts and circuit board, including schematics, that you need to solder) for approximately $30 ... 35 on eBay from some sellers in Asia. You can probably find red laser (650 nm) kits even cheaper. Or you can buy just the tube with the diode and lens, and you can find the driver circuit on eBay or somewhere else already assembled, if soldering is not your thing, and it won't be much more expensive.
So, you don't have to be an electronics wizard to do this. If you buy a pre-assembled driver (something like $15 ... $20 online) you therefore skip the soldering part, and all you need to do is hook it up to the diode. Everybody can do that, right? :)
WARNING: Always first connect the laser diode to the driver, then connect the driver to the battery! Never connect the driver first to the battery - this will kill the diode! Laser diodes are not LEDs, they are very sensitive. Connect the diode to the driver and leave it connected forever, this is the only way to avoid mistakes. I burned a lot of diodes before I figured this out.
The somewhat harder but very cheap way
Some of the things I said above still apply - you still have to buy or build a driver circuit. But, instead of buying the laser diode, you can extract it from an old DVD or Blu-Ray writer.
"What? Does that mean I already have the diode somewhere in my house and I'm not even aware of it?"
That's right. DVD writers that can write disks at 16x speed or faster (that's writing speed, not reading speed) contain diodes usually at least 150 mW if not more powerful. A DVD writer will provide a red (650 nm) diode, a Blu-Ray writer will provide a blue-violet (405 nm) diode. All that's required is that the writer can still write disks. It doesn't matter if it makes a lot of coasters so it's time to retire it, all that counts is the raw burning power.
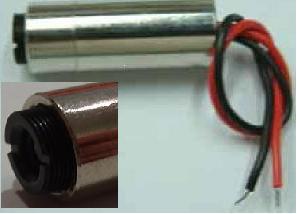
Most (but not all) diodes look like this:
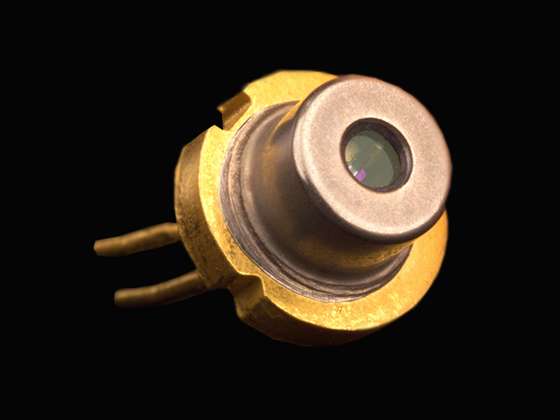
Some will lack the transparent window at the top (open-case diodes); some will lack the case altogether - those are more fragile and you can easily break them. The best ones are fully encased in metal, with a transparent window at the top, as shown above. They are very tiny anyway, smaller than a penny - be careful how you handle them.
So, just break the DVD writer open and rummage inside for the diode. I won't provide too many details, there are plenty of instructions online if you can't figure out yourself which one is the laser diode. Google it if you're lost. Also keep in mind: there are usually at least two diodes inside, and only one of them is the powerful laser diode used for writing. The other one might be a much weaker infrared diode used for reading - that's not the one you want.
Again, it has to be a DVD writer (not a DVD reader, not a CD writer, not a CD reader) at least 16x writing speed, or a Blu-Ray writer (not a Blu-Ray reader).
This is how to connect a red (DVD) diode to the driver:
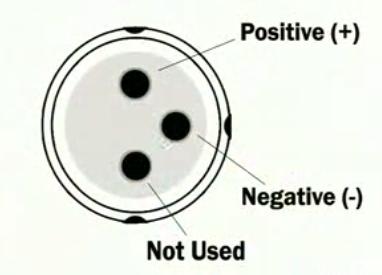
This is how to connect a blue (Blu-Ray) diode to the driver:
Once you have the diode, connect it to the driver (pre-configured at 85 mA or something like that) and after that (not before!) connect the driver to the battery. The diode should be INCREDIBLY BRIGHT. If it's not very bright, if it's just like an ordinary LED, you broke it - you can toss it in the garbage can at this point.
To focus the beam, you can use an ordinary magnifying glass, and that should suffice for a few experiments. But there's a better way: purchase a laser lens tube assembly online, containing a much weaker diode, and swap the diodes.
There's a small company called AixiZ (I'm not affiliated with them in any way) who sells very small (5 mW) laser diodes (these are just like a laser pointer, very safe, but they can't burn anything) in a tube with adjustable lens, for a very small price - they are around $5 online or on eBay.
Buy one of these, very gently extract the small laser pointer diode, and instead install the more powerful burner diode. After that, just see above - connect it to the driver, set the current, enjoy.
Make sure to adjust the lens: focus the beam as small as possible at the distance you want to burn objects. The smaller the dot, the easier it is to burn. I managed to pop balloons, poke holes into paper, etc. with a 95 mW laser, but the beam was focused to the size of a pinpoint. Also keep in mind, if you focus it that small at, let's say, 50 cm from the lens, then it's only truly effective at 50 cm, no more, no less.
The very hard way
One could argue that even the previous method is "cheating", since you're not really building the laser diode yourself, you're just buying it or extracting it from another device. If you agree with that, a diode laser is off-limits - you can't make a laser diode from scratch in your garage. A gas laser is the only way.
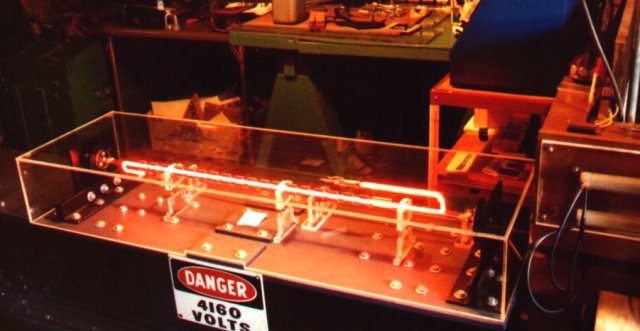
This is a huge project. Essentially, you have to make a big glass tube like the ones used in neon signs, put it between two very special and very carefully calibrated mirrors, feed the whole thing with very high voltage (20 kV is common), and pray it works.
The gas inside the tube can be:
- a mixture of helium and neon (the He-Ne laser); this one generates an orange beam, is one of the easier gas lasers, was widely used before diodes took over
- mercury vapors (the Hg laser); makes a bright green beam, it's somewhat harder to trigger but the materials are easier to come by (a drop of mercury)
- nitrogen gas (the N2 laser); this is an invisible laser, ultraviolet, one of the easiest to trigger, but... well... it's invisible, so it's less fun
- carbon dioxide (the CO2 laser); also invisible (infrared), also easy to trigger, used by the military to make laser weapons
This is not for the faint of heart. It requires careful preparation, a pretty long execution time and, last but not least, the investment may not be trivial - you need a vacuum pump, you need to purchase the special mirrors, you need to make or order the special tube, you need a high-voltage power supply, etc. You can probably stay below $1000 if you know what you're doing, you're lucky, and you're good at dumpster diving, but expect to invest a few months of work anyway. If you're extremely lucky and extremely persistent, you can probably beg or dig up all the parts you need for next to nothing - so it's a balance between price and effort/patience.
I have not done anything like this. Back in high-school, I attempted to build a Hg laser, and failed when I couldn't procure the "magic mirrors". I would very much like to make this old dream come true. But it's a lot of work, so... we'll see. The little diode lasers I made so far are so much fun, so for now I'm satisfied.
Laser safety
A LASER THAT CAN BURN THINGS IS DANGEROUS!!!
Remember, you're not building a toy. This is a device that can do permanent damage to your eyesight and all it takes is a fraction of a second - faster than you can blink. Also, obviously, you can start a fire by mistake - the risk is small but not zero. The Wikipedia page on laser safety is very good, make sure you read it before you start working on this project:
http://en.wikipedia.org/wiki/Laser_safety
This is the bottom line:
Lasers below 5 mW are "class IIIa" lasers (or class II, or I). These are the laser pointers you can buy for $5 at the corner shop. They are not dangerous, you can play with them any way you like.
Lasers between 5 mW and 500 mW (the kind this document teaches you to build) are "class IIIb" lasers. Damage to the eye can occur pretty fast. It is recommended to wear laser goggles while working with such lasers.
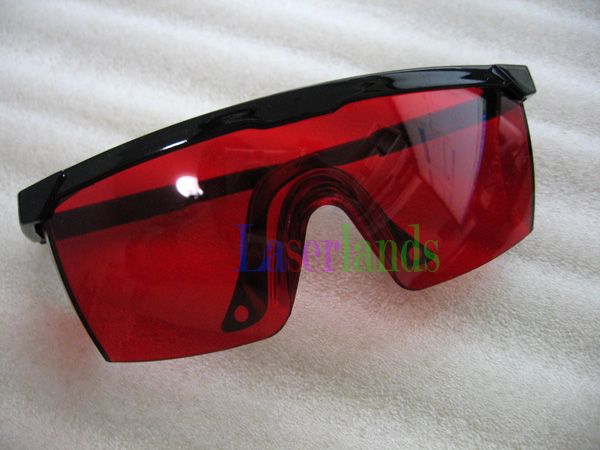
The goggles are fine-tuned to the specific wavelength of the laser. So, if you build a 650 nm red laser, you need to buy 650 nm goggles; for a 405 nm laser, buy 405 nm goggles, etc. The color of the right type of goggles will always be the complementary color of the laser, so for a blue laser the correct goggles will be orange-red, etc.
In any case, you can't replace the laser safety goggles with sunglasses or a welding mask or anything else. These goggles are fine-tuned devices, specifically made for one purpose only. Nothing else is effective, not even close.
The same sites that sell ready-to-use lasers usually will also sell goggles. See the links above. Or google "laser safety goggles" and choose your own vendor.
Don't shine the laser towards reflective objects - glass, metal, etc. In general, don't wave it around like a light saber, no matter how tempting that might be. Buy a green laser pointer (5 mW, class IIIa laser), and wave that one if you want, but a class IIIb device is not for foolish pranks like that.
When you're not using it to burn things, adjust the lens to de-focus the beam. If you shine it across the room on the opposite wall and the beam section is the size of a ping-pong ball at that distance, that means it's de-focused and mostly harmless. Remember, the more focused the beam, the greater the damage, so if it's de-focused like that the risk is greatly reduced (but not completely eliminated).
NEVER LOOK INTO THE BEAM!!! Never, ever. Goggles or not, de-focused or not, doesn't matter. If it's more powerful than a mere laser pointer, do not look directly into it, ever. If it's a "naked" diode without a lens that you extracted from a DVD writer, it's OK to watch it directly for a short while, just don't bring it too close to the eye. But, the moment you put a lens in front of it, it is forbidden to point the laser at the eye.
NEVER POINT THE BEAM AT PEOPLE!!! It's rude, dangerous, and it can get you in trouble with the law. Never point it at moving vehicles, airplanes, or even houses, etc. - if there are people inside, don't point it that way, it's that simple.
Don't let children play with a class IIIb laser. This is for adults only. Heck, even some adults should not be trusted with something like this. :)
Resources
The Professor's homebuilt lasers page
DYI - How to make a burning laser the right way
Have fun and stay safe.