Submitted by florin on
Running a VPN server with OTP? Thinking to run your own OTP authentication backend, instead of the public backend? This is how to do it.
This is part 2 of a series of articles:
- multifactor authentication for distributed VPN mesh - part 1, server and client configuration, cloud OTP
- multifactor authentication for distributed VPN mesh - part 2, token configuration, local OTP
- multifactor authentication for distributed VPN mesh - part 3, VPN mesh
With the cloud backend for OTP authentication, you could use the YubiKey NEO token as-is. The identity stored on the token is also stored on the public Yubico authentication cloud, so the cloud can recognize the token.
This wouldn't work if you run your own OTP auth backend. The identity cannot be extracted from the token (that would open the door for impersonation). You'll have to generate a new identity, store it on the token, and upload it to your backend as well.
This chapter and the following are largely based on this HOWTO:
http://forum.yubico.com/viewtopic.php?f=31&t=1424
Also see:
http://blog.bogosity.se/2014/04/13/requering-both-an-ssh-key-and-a-yubikey/
http://www.raczylo.com/blog/OpenVPN-with-YubiKey-and-GoogleAuthenticator.html
http://pragmasec.wordpress.com/2014/07/12/set-up-yubikey-with-pam-for-openvpn-ssh-and-squirrelmail/
http://www.andybotting.com/using-the-yubikey-for-two-factor-authentication-on-linux
Configure the VPN server
On the VPN server, install the Yubico OTP backend software:
add-apt-repository ppa:yubico/stable
apt-get update
apt-get install yubikey-ksm yubikey-val libpam-yubico
Configure the two services (yubikey-ksm and yubikey-val) to use the local MySQL server as a storage backend.
Edit /etc/pam.d/openvpn and modify it like this, to enable local OTP authentication:
# public OTP authentication
#auth	required	pam_yubico.so authfile=/etc/yubico/yubikeyid id=16 debug
# local OTP authentication
auth	required	pam_yubico.so authfile=/etc/yubico/yubikeyid id=1 url=http
://127.0.0.1/wsapi/2.0/verify?id=%d&otp=%s debug
#
# Radius PIN
auth	required	pam_radius_auth.so debug
#
# Avoid having to create local Unix accounts
account	required	pam_permit.so debug

Generate the identity, store it on the VPN server
You'll need a secure system to generate the identities - using your laptop is usually a bad idea. Store all long-term files on storage that is offline when not used. All security precautions that you would take in case of a CA (Certificate Authority) also apply here.
On the secure system, install the gnupg package. You'll also need the ykksm-gen-keys script which is part of yubikey-ksm:
https://developers.yubico.com/yubikey-ksm/
Generate the GPG import key:
$ gpg --gen-key
gpg (GnuPG) 1.4.18; Copyright (C) 2014 Free Software Foundation, Inc.
This is free software: you are free to change and redistribute it.
There is NO WARRANTY, to the extent permitted by law.

gpg: directory `/Users/someuser/.gnupg' created
gpg: new configuration file `/Users/someuser/.gnupg/gpg.conf' created
gpg: WARNING: options in `/Users/someuser/.gnupg/gpg.conf' are not yet active during this run
gpg: keyring `/Users/someuser/.gnupg/secring.gpg' created
gpg: keyring `/Users/someuser/.gnupg/pubring.gpg' created
Please select what kind of key you want:
   (1) RSA and RSA (default)
   (2) DSA and Elgamal
   (3) DSA (sign only)
   (4) RSA (sign only)
Your selection? 2
DSA keys may be between 1024 and 3072 bits long.
What keysize do you want? (2048)
Requested keysize is 2048 bits
Please specify how long the key should be valid.
         0 = key does not expire
        = key expires in n days
      w = key expires in n weeks
      m = key expires in n months
      y = key expires in n years
Key is valid for? (0)
Key does not expire at all
Is this correct? (y/N) y

You need a user ID to identify your key; the software constructs the user ID
from the Real Name, Comment and Email Address in this form:
    "Heinrich Heine (Der Dichter) "

Real name: yubikey-ksm import key
Email address:
Comment:
You selected this USER-ID:
    "yubikey-ksm import key"

Change (N)ame, (C)omment, (E)mail or (O)kay/(Q)uit? o
You need a Passphrase to protect your secret key.

We need to generate a lot of random bytes. It is a good idea to perform
some other action (type on the keyboard, move the mouse, utilize the
disks) during the prime generation; this gives the random number
generator a better chance to gain enough entropy.
gpg: WARNING: some OpenPGP programs can't handle a DSA key with this digest size
+++++....++++++++++++++++++++..++++++++++...+++++++++++++++++++++++++..
+++++++++++++++..+++++.+++++++++++++++++++++++++++++++++++...+++++++
+++.++++++++++>+++++..........+++++
We need to generate a lot of random bytes. It is a good idea to perform
some other action (type on the keyboard, move the mouse, utilize the
disks) during the prime generation; this gives the random number
generator a better chance to gain enough entropy.
.++++++++++.++++++++++++++++++++++++++++++..+++++.++++++++++..+++++++
+++++++++++++.++++++++++.+++++.+++++.+++++.++++++++++++++++++++.+++++
++++++++++++++++++++>.++++++++++.......>+++++................................
.......................................................................................
.................................................................+++++
^^^^^
gpg: /Users/someuser/.gnupg/trustdb.gpg: trustdb created
gpg: key C14E5A21 marked as ultimately trusted
public and secret key created and signed.

gpg: checking the trustdb
gpg: 3 marginal(s) needed, 1 complete(s) needed, PGP trust model
gpg: depth: 0  valid:   1  signed:   0  trust: 0-, 0q, 0n, 0m, 0f, 1u
pub   2048D/C14E5A21 2014-09-05
      Key fingerprint = XXXXXXXXXXXXXXXXXXXXXXXXXXXXXXXXXXXXXXXXXXXXXXXXXXX
uid                  yubikey-ksm import key
sub   2048g/6F539F90 2014-09-05
Write down the public fingerprint of the key (the line beginning with "pub" above), or you could always get it later with gpg --list-keys. The results of the command you’ve run are in .gnupg in your home directory.
Now you'll generate the new key identity. Ideally, this should be done on a secure system, with all data piped between commands directly via shell pipes, so the identity is never stored on long term storage. But here we will store it temporarily in text files, for clarity.
For the serial number of the key, pick some random number. The Unix time in seconds might be a good option, since perfect randomness is not critical at this step.
ks=`date +%s`
ykksm-gen-keys $ks > key${ks}.txt
This is the result:
$ cat key1409952015.txt
# ykksm 1
# serialnr,identity,internaluid,aeskey,lockpw,created,accessed[,progflags]
1409952015,ccccgfcldkcv,9f44acc75b0f,5706256dd94fe0be73b32cecef4fae40,769819cbca50,2014-09-05T14:20:48,
# the end
The long line with lots of numbers has several fields:
- the first field (14099...) is the serial number you used when you generated the key
- the second field (cccc...) is the public ID of the key - this is an important field that you will use later
- the third field (9f44...) is the private ID
- the fourth field (5706...), which is the longest, is the secret key
Now ASCII-armor that file using the GPG key generated above. For the -r parameter use the fingerprint of the GPG key (see above).
$ gpg -a --encrypt -r C14E5A21 -s key1409952015.txt

You need a passphrase to unlock the secret key for
user: "yubikey-ksm import key"
2048-bit DSA key, ID C14E5A21, created 2014-09-05
This is what you get:
$ ls -lh key1409952015.txt*
-rw-r--r--  1 florinandrei  staff   199B Sep  5 14:20 key1409952015.txt
-rw-r--r--  1 florinandrei  staff   1.3K Sep  5 14:25 key1409952015.txt.asc
Import this identity into the KSM (Key Store Manager) database on the VPN server. You could run this command on the secure system, if you already have a VPN tunnel open to the VPN server, where the MySQL server is. The database name, username and password you need at this step are in /etc/yubico/ksm/config-db.cfg on the VPN server. You will also be prompted for the passphrase for the GPG import key. X.Y.Z.K is the IP address or hostname of the MySQL backend on the VPN server. Basically, ykksm-import establishes a connection to MySQL and copies the identity into it.
ykksm-import --verbose --database 'DBI:mysql:dbname=ykksm;host=X.Y.Z.K' --db-user ykksmreader --db-passwdOn the VPN server, edit /etc/yubico/yubikeyid and add this line:
username:public-idWhere public-id is the public part of this identity (here it's cccc.....).
Store the identity in the token
On the secure system, install the YubiKey Cross Platform Personalization Tool:
http://www.yubico.com/products/services-software/personalization-tools/use/
Plug the NEO token into USB, then launch the personalization tool.
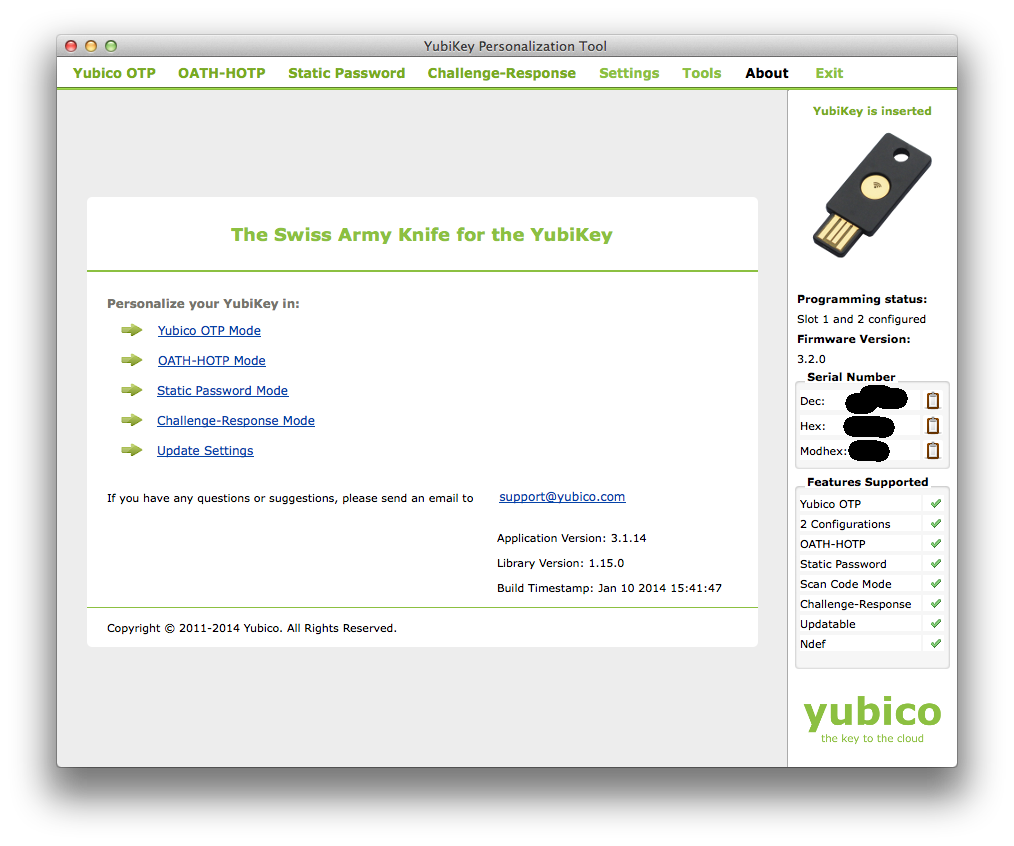
Click the Yubico OTP Mode link to program the Yubikey. Then select Advanced. You will then see this screen:
Now refer to the file key1409952015.txt generated above. The fields in that file need to be copied to the GUI: public ID (identity), private ID (internaluid), and secret key (aeskey), highlighted in bold characters below:
$ cat key1409952015.txt
# ykksm 1
# serialnr,identity,internaluid,aeskey,lockpw,created,accessed[,progflags]
1409952015,ccccgfcldkcv,9f44acc75b0f,5706256dd94fe0be73b32cecef4fae40,769819cbca50,2014-09-05T14:20:48,
# the endThe section titled Yubico OTP Parameters in the screenshot above needs to receive these fields (the three big blacked out parts in the middle of the screenshot). Copy each field and paste it into the corresponding place in the GUI. Then click Write Configuration.
Fire up a text editor and touch the gold sensor on the NEO. The OTP printed out should begin with a new prefix, reflecting the new identity you've created.
Obviously, this new identity will not work with Yubico's public cloud anymore; on the NEO, you could work around that by writing this identity into Slot 2 on the token (requires long press on the gold sensor, instead of a short tap). If you overwrite the identity in Slot 1 (the one that works with the public servers), it's gone forever - so choose wisely. :)
Test it
Just as before, plug the token into the VPN client. Launch the client. Enter the username in the username field.
In the password field, enter the PIN but don't press Enter yet. Instead, touch the gold sensor on the NEO - it will generate the OTP and hit Enter for you.
If all goes well, the connection should be established.